A Trad![]() Boat
Special
Boat
Special
Building a Model Thames Barge
The frames are standing
I started by laying the keel - a straight piece of hardwood about 9mm square. On to this the frames would stand. As soon as the transom, bow piece ,and two or three frames were standing I glued in the in-whales which I had previously laminated, into the notches at the top of frames. In order to get the frames upright and square to the keel I made up a little jig from some scrap 2"x2" and moved it along, clamping it to the board each time. A little jig clamped to the end of the board held the transom in place and similarly at the bow. These did not come out until all the framing was done. Once the framing was done I laid a second length of 9mm hardwood inside the frames along the length of the vessel and this way constructed a strong girder. In the full size barge this is an enormous baulk of timber.
Frames in place and central section skinned with plywood. In this picture, the frames are standing, and the centre section of the hull has been clad in thin plywood since it is largely a box shape. At its ends, the plywood rests on half of the width of the frame so that there is room for the plank lands which are to come. The in-whales are in the notches which we cut out of the frames. I have already made space for the centre hatch by removing some of the deck beams, and in this shot the hatch coaming is in. The for and aft hatch spaces are yet to be cut out.
(Was I building this barge again I would notch the frames at the turn of the bilge and put in a longitudinal stringer to which these plywood panels could be glued. I would also use much thinner plywood for many of the frames so that it would take up a profile more easily when it came to planking. (Substantial frames will need to be left in the way of the mast, under the forward winch, and to support the hatches for the mizzen mast)
A solid block of Balsa has been carved at the bow. I was surprised to find that this block was easy to carve and I used a little curved cardboard template based on the drawings of the bow section to make sure that it was about the right shape before rubbing it down and finishing the shape by running a flexible batten around the frames to the bow.
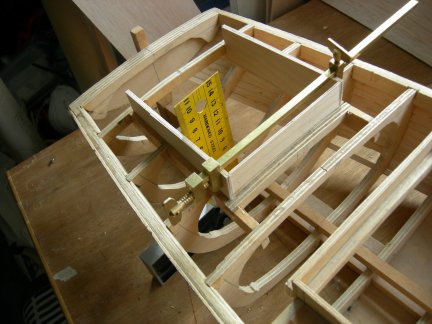
Cutting out the hatch openings
The other hatch openings have now been cut out by removing some of the deck beams.
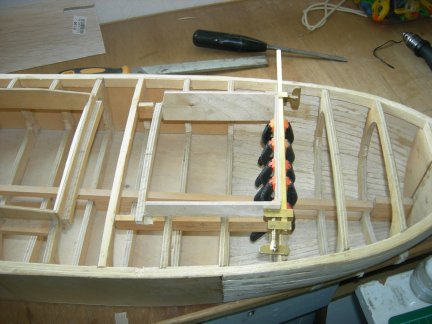
Putting in the hatch coamings
Once the openings for the deck hatches have been cut out, the deck coamings will need to be glued to the deck beams. Unfortunately the deck beams do not coincide with the positions of the hatches so additional deck beams (curved to the original camber) will have to be put in. I used the left over bits of the beams that I had cut out when I made the central hatch opening. Remember that the deck covering will need to be to be supported, particularly in the way of the mast, so when you come to insert the new beams ensure that they are outside the hatch openings.
The aft hatch takes shape. A deck beam has been inserted so that the forward hatch coaming can be glued to it. The beam is outside the coaming so that the deck covering will have a ledge on which to sit.The forward hatch coamings going in. Once again the miniature brass sash clamp comes in useful. To get these coamings properly square I should have put them in before planking the bow section.
The deck hatch coamings really need to be fitted before the hull is planked. That way a square can be set on the work surface and poked up between the ribs to ensure that each part is upright. My hatches are made up from two thin layers of ply glued together and then glued to the deck beams. I reinforced the corners of the smaller hatches with a bit of square stuff and then clamped the whole thing up as you can see in the photograph.
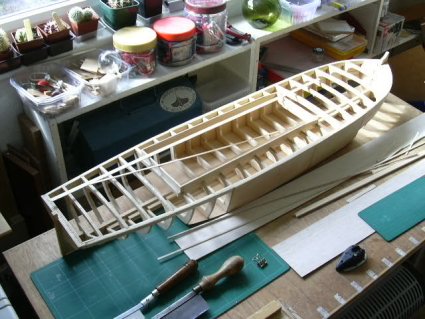
Planking up the first skin
Prepare for planking by running a flexible batten around the frames and then rub the trailing edge of each frame down so that the batten lies flat throughout its length. (keep the profile intact). Rubbing down can be done with a file or sandpaper and ensures that there are no hard edges. Once done the rest is much easier.
I planned to use two skins of Balsa planking and finish with epoxy. I have been advised that this produces a strong finish. Since I am a little nervous about it I may talking to other skippers before finalising the hull. In the meantime the first skin is on. I found that fairly narrow planking is the clue, especially in the more difficult sections where the shapes change from the boxy centre section to the rather beautiful curve at the bow. Then bits and pieces to fill (these are called stealers) Aft, the planking takes up a double curve especially towards the keel and was fairly difficult to do. However once a few planks were done the rest became much more straightforward and I would certainly do it this way again - partly because it feels nearer to the way the original barge builders did it.
Preparing planking
I didn't really tumble to the best way of doing this until well on into the job.
The trick I found goes like this. Measure the width of the section from which the planking will start, say the square bit on the underside before the turn of the bilge. Now measure the length of the transom frame on which the planks are going to land. You can do this by making up a flexible ruler in mm on a bit of paper. You will find that the length of the transom frame at this point is shorter than the box section so the planks need to taper. Mine taper from 9mm to 5mm.
Cut some out and lay the first one. Once that is firm, take the second plank and offer it up alongside the first. You will probably find that minor irregularities in the frame will mean that in places the two planks don't lay precisely together. A minute or two with a file quickly sorts this out. Now the second plank can be put in - and so on. Its interesting to do, and not at all tedious.

Hatches cut out and coamings in place. First skin on the port side is complete
From aft, first skin aft and a plank from the second skin running fore and aft almost at deck level, but leaving room for a hardwood rubbing strip.
Glues
I used ordinary "blue" weatherproof pvc (blue bottle) along the sides of the the planks, and on to the frames, holding everything in place with miniature clamps and map pins. OK, map pins leave a fairish hole in the plank but they have a flat top which pushes it firmly into place, and the holes may be filled with a little glue later. After the glue dried, I rubbed "blue glue" into any cracks remaining between the planks and then cleaned off with a damp rag.
It is useful to be able to clamp both ends of the plank and to use small flat ended clamps to ensure that the edges of the planks mate up properly - it sounds a little complicated but actually takes seconds to do. At the end, when the there is no space left for clamps, then fingers will have to do. Hold tight and daydream!
More will follow as the job progresses
Back to Part 1: click here